How to Tighten a Motorcycle Chain (Step-by-Step Guide)
TL;DR
- Correct chain slack is typically 25-35mm (about 1 to 1.5 inches) measured at the midpoint of the lower chain run, though always check your owner’s manual for your specific model.
- A chain that’s too loose slaps the swingarm, skips under acceleration, and can derail; too tight and you’ll blow wheel bearings, gearbox seals, and burn through chains fast.
- You’ll need a rear stand or center stand, a socket wrench (usually 24mm-32mm for the axle nut), and a tape measure or chain slack tool.
- The whole job takes 15-20 minutes and costs nothing beyond a torque wrench and basic sockets you probably already own.
- Always re-check alignment using the hash marks on both sides of the swingarm before torquing the axle nut back down.
Why Chain Slack Is the Most Neglected Bike Maintenance Item
Loose or tight chains are the number one chain-related failure point on street bikes, according to data from the Motorcycle Industry Council’s 2023 maintenance survey. Most riders check tire pressure and oil level religiously but ignore the chain until it starts slapping or howling.
Here’s why that’s a problem. A chain that’s too loose will slap against the swingarm under hard acceleration, shorten sprocket life, and in extreme cases jump the rear sprocket entirely. A chain adjusted too tight puts a constant bending load on every link and hammers the wheel bearings with every rotation. Either way, you’re looking at accelerated wear on a part that costs $150-$400 to replace as a full chain-and-sprocket kit.
Checking and tightening your motorcycle chain takes 15 minutes. Learning how to do it correctly the first time saves you from the much worse job of replacing everything downstream.
What You Need Before You Start
| Tool | Why You Need It |
|---|---|
| Rear paddock stand or center stand | Gets the rear wheel off the ground so it can spin freely |
| Torque wrench with the correct socket | Axle nuts typically require 60-110 ft-lbs; guessing will strip threads or leave the axle loose |
| Socket set (24mm-32mm common) | Fits the axle nut and adjuster lock nuts |
| Tape measure or chain slack tool | Measures slack precisely at the midpoint of the lower run |
| Chain lube (Motul C3, DID Chain Lube, or similar) | Worth applying after adjustment while the wheel is still off the ground |
| Owner’s manual | Lists the exact slack spec and axle torque for your model |
You don’t need a lift. A paddock stand under the swingarm spools works fine for most bikes. If you’re on a cruiser with a center stand, use that instead.
How to Check Chain Slack Before You Adjust Anything
Before reaching for a wrench, measure what you’re working with. Adjusting a chain that’s already in spec is a waste of time, and it’s easy to accidentally over-tighten.
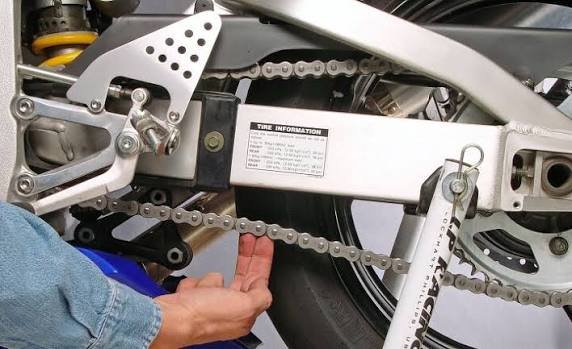
Put the bike on the rear stand so the wheel spins freely. Find the midpoint of the lower chain run, the section that runs from the front sprocket down to the rear sprocket along the bottom. Push the chain straight up with two fingers, then straight down. The total distance it moves is your slack measurement.
Most street bikes call for 25-35mm of slack (roughly 1 to 1.5 inches). Sport bikes often run tighter: 20-30mm. Cruisers can run a little looser. Your owner’s manual has the exact spec for your model, and it takes 30 seconds to look it up. Don’t skip this.
If the chain has zero play or you feel resistance when pushing it up, it’s already too tight. If it flops more than 40-50mm, it needs adjustment. Anywhere in your manual’s spec range, leave it alone.
How to Tighten a Motorcycle Chain: Step-by-Step
Step 1: Loosen the Axle Nut
The rear axle nut holds the wheel in place. Before you can move the wheel rearward to take up slack, this nut has to break free. It’s usually on the right side of the swingarm and requires a large socket, commonly 24mm, 27mm, or 30mm depending on the bike.
Don’t remove it. Just break it loose enough that the axle can slide when you turn the chain adjusters. If your bike also has a brake torque arm or ABS sensor bracket secured to the axle, make note of how it’s assembled before things move.
Step 2: Loosen the Adjuster Lock Nuts
On both sides of the swingarm, near the axle, you’ll find chain adjusters: a threaded bolt or barrel adjuster that pushes the axle rearward as you turn it. Each adjuster has a lock nut that holds it in place once adjusted. Loosen both lock nuts, but don’t remove them.
Most bikes use one of two systems. The first is a bolt and lock nut where you turn the bolt clockwise to push the axle back. The second is a snail-cam style where turning the cam repositions the axle. Both accomplish the same thing. Your manual will show which one your bike uses.
Step 3: Adjust Both Sides Equally
Turn both adjusters by the same amount, one full turn at a time or one notch at a time on snail-cam systems. Keeping both sides equal is what maintains rear wheel alignment. If the left adjuster is two turns out and the right is three turns out, your wheel is cocked to one side, which causes the tire to wear unevenly and the bike to track crooked at speed.
Most swingarms have alignment hash marks stamped into the metal on both sides. After each adjustment, check that the axle sits at the same hash mark position on both sides. These marks are a reference, not a precision instrument, but they’ll catch gross misalignment before you torque everything down.
After each round of adjustment, re-measure the slack at the midpoint of the lower chain run. Keep adjusting in small increments until you’re within your manual’s spec. It’s easy to overshoot and end up too tight.
Step 4: Check Wheel Alignment Precisely
The hash marks get you close. For a more accurate check, stand behind the bike and sight down the wheel. It should track perfectly in line with the swingarm and the front wheel. If the rear wheel looks canted left or right, go back and equalize the adjusters.
A second method: hold a long straightedge against the side of the rear tire and extend it toward the front of the bike. On a bike without bodywork in the way, the straightedge should contact the front tire at two points, like a chord touching both ends of a curve. Deviation indicates misalignment.
Step 5: Torque the Axle Nut and Lock Down the Adjusters
Once the slack is correct and the wheel is aligned, tighten the adjuster lock nuts snugly against the swingarm so the adjusters can’t move, then torque the axle nut to your manual’s spec. Common torque values run from 60 ft-lbs on smaller bikes up to 110 ft-lbs on larger cruisers and sport bikes. Using a torque wrench here isn’t optional; axle nuts that are too loose can back out under hard braking.
After torquing, spin the wheel and re-check slack one more time. The chain may feel slightly tighter in certain positions because no chain wears perfectly evenly. The tightest point, not the midpoint average, should still fall within your manual’s spec.
Three Mistakes That Ruin a Chain Adjustment
Adjusting with the bike on the sidestand. The rear suspension compresses differently under the bike’s weight, which changes where the chain sits in its travel arc. Always adjust on a rear stand or center stand with the wheel off the ground.
Ignoring the tight spot. Chains wear unevenly. Rotate the wheel by hand through a full revolution while watching the chain. If one section goes noticeably tighter than the rest, that’s your tight spot. Set slack based on that section, not the average. A chain with a tight spot bad enough that you can’t adjust around it needs replacement.
Over-tightening to fix a stretched chain. A chain that keeps going loose isn’t a chain that needs more frequent tightening; it’s a chain that’s worn out and needs replacement. Running a stretched chain destroys front and rear sprockets fast. The rule of thumb: if the adjuster has reached its maximum rearward travel and the chain is still loose, replace the chain and both sprockets together as a set.
How Often Should You Check and Adjust Your Chain
Check chain slack every 500-600 miles on street bikes, or after any session in rain or mud. Wet riding accelerates chain wear significantly. New chains stretch the most in the first 500 miles after installation, so check a new chain after the first tank of gas and again at 300 miles before settling into your normal interval.
Most manufacturers recommend cleaning and lubricating the chain every 300-600 miles with a purpose-made chain lube like Motul C3 or DID Chain Lube, not WD-40. WD-40 is a water displacer, not a lubricant, and it strips the factory grease from O-ring and X-ring chains.
Frequently Asked Questions
How much chain slack is correct for a motorcycle?
Most street motorcycles call for 25-35mm of free play at the midpoint of the lower chain run, measured by pushing the chain up and then down. Sport bikes often specify 20-30mm, and cruisers can run slightly more. Always confirm the exact figure in your owner’s manual because specs vary by model and even by year.
Can I tighten a motorcycle chain without a rear stand?
You can get the bike up on a center stand if it has one. Without a stand, you’d have to adjust with the bike on the sidestand, which gives you an inaccurate slack reading because the suspension load changes chain tension. A basic paddock stand costs $40-$60 and pays for itself the first time you use it.
How do I know if my chain is too tight?
A chain that’s too tight will have little or no free play when pushed up and down. You may also hear a whining or grinding sound from the drivetrain, feel resistance when rolling the bike backward by hand, or notice the throttle feels slightly heavy at certain wheel positions. Over time, a tight chain destroys wheel bearings and gearbox output shaft seals.
How do I know when a motorcycle chain needs replacing instead of adjusting?
Replace the chain when the adjuster bolts have reached maximum rearward travel and the chain is still loose, when you see a tight spot that can’t be adjusted out, when individual links are stiff or kinked, or when there’s visible rust, corrosion, or missing O-rings. Replace the chain and both sprockets together. Installing a new chain on worn sprockets accelerates wear on the new chain.
What happens if I ride with a loose motorcycle chain?
A loose chain slaps the swingarm repeatedly under acceleration, causing paint and metal damage. It can jump the rear sprocket if loose enough, which locks up the rear wheel. Even before that point, excess slack causes inconsistent power delivery, accelerates sprocket wear, and can damage the chain guide. Don’t ride on a chain that’s outside spec.